
- 145 Page in depth guide of tricks
- Features how-to, troubleshooting, and other skate secrets
- Written by underground skater Tony Waters
 Navigation
- Home
- Introduction
- Beginner's Guide
- Flatground Tricks
- Grinds
- Common Mistakes
- Get Your Tricks Higher
- Guaranteeing Success
- Success Enhancers
- Skateboard Buying Guide
- Making a Skate Video
- Making a Skate Ramp
How To Make A Skateboard Ramp
General Guidelines
- Decide on the type of ramp you want to build and sketch out the design and dimensions on paper so you have a clear idea of what you are about to build
- Acquire the materials required for your ramp
- Find a work space to build your ramp. Lay out your supplies. If you’re planning to build a fairly large structure, build it on the site.
- For ramps with curved transitions, use the string and compass method
- Once you’ve drawn and cut your templates, next comes the bracing. There are two bracing methods described by this guide. Both are effective, but the cut-out version, while more work, is a stronger design.
- Once you’ve done the framework, you’ll most likely need to prepare the top pieces of the plywood (which must bend to fit the transition without breaking). Do this by propping up the sheets, already cut to size, at a sloping angle and soak with a hose at low pressure for an hour or so. As the wood becomes soaked, apply an increasing amount of weight to the center of the board (using bricks or something similar) until the wood attains the desired curve. Now nail the wood onto the framework’s 2×4’s. If your ramp need coping, make sure to leave enough space for it to fit snugly. Always go WITH the grain of the wood while bending and apply the ply!
- For a smoother transition, sand the bottom edge of the top sheet at an angle flush with the ground. Check for jagged splinters. Sand or paint if desired. Paint will make your ramp smoother and will all you to skate faster!
- Duct tape, airplane or electrical tape or aluminum strips may be added to smooth the transition’s bottom edge.
- Congratulate yourselves on a job well done and start skating.
Helpful Hints
- If this is your first ramp, keep it simple. A quarter-pipe or small launch ramp makes a good first project. Then you can add on.
- Be resourceful. If you don’t have access to many tools, try to borrow some. If you can’t afford wood, scrounge for some scrap wood.
- Platform ramps and wood curbs are big again, and they’re pretty easy to build. To ensure good design and durability, experiment on paper before you slap something together.
- If you have nowhere to keep a ramp permanently, consider building a few compact, portable ramps to bring to your favorite weekend spots.
- Make sure your design is adequately braced under the top sheet, so you don’t fall through the ramp (which I’ve seen happen).
- For portable ramps, wheels or handles can be attached for easier transport.
- Two small curved ramps, built to fit flush with the wall, can be spaced apart for a nice channel-wall ride set-up!
- For extra kick on quarter-pipes, “obtain” a slick parking block and place it atop the ramp, for big rock-and-rolls and lapover tricks.
- Most of all, experiment, try new things and have fun with your ramp. Always wear pads when learning to ride a ramp and don’t snake runs in front of your friends.
Material You will Probably Need
- 3/8″ X 4′ X 8′ sheets of plywood
- 8′ 2×4’s
- electric, handheld or bench saws
- handsaw
- hammer & nails
- electric sander/sandpaper
- drafting compass
- string & chalk
- garden hose
- sawhorses
- nail punch
- ink pen
- wood screws
- 3/8″ PVC pipe
- pushpins
String and Compass Method for Transition Curves
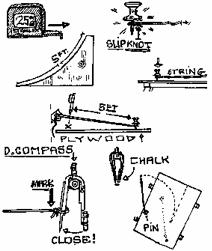
- Figure how much transition curve you want (in feet & inches) and how much vert, if any.
- Tie one end of the string around the pushpin and stick it in the sheet as shown.
- Holding the string taught, measure out exactly the amount of transition (see step one) and mark this on the string with an ink pen.
- Tie the drafting compass to the other end of the string and tighten it so the slipknot is right on top of the mark you made.
- Holding the string taut, swing the compass from the sheet’s edge in a quarter-circle, marking the template with the chalk. You may need to move the contraption around to get the desired curve and best use of space!
- Place sheet on sawhorses and cut out templates carefully.
- If you want to make a ramp with a decreasing transition, you need to modify the above steps and instead of using a pushpin, use a round object that is 6 inches to 3 feet in diameter, such as a paint can or a round garbage can. Attach the string to the round object and somehow secure it to the wood in place of the pushpin in step 2. As the string winds around the round object, it will get shorter and your transition will become tighter. This is called a decreasing radius transition and it is very cool when making launch ramps and quarter pipes. Experiment and eyeball in a cool transition.
Transitional Bracing Methods
Number One: Cut Out (preferred method)
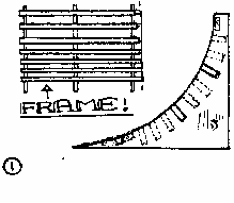
- You need 3 identical templates. Using a 2-by-4 as a model, trace cut marks holding it flush with curve’s edge.
- Distribute brace/cut marks as evenly as possible.
- With a jigsaw, cut out all marked spaces just outside of lines.
- Nail in some bracing 2×4’s to hold up structure.
- Cut 2×4’s to width of ramp.
- Slide 2×4’s into cut slats (they should fit snugly).
- Connect platforms, top platforms, additional bracing or coping.
- Apply to sheet(s) (see string and compass)–use nail punch to drive nails flush.
Number Two: Side Nail
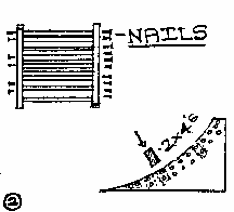
This method is quicker to build and much less work.
- After cutting the templates, simply nail in 2×4’s through the sides at the same angle as the first method, using 3″-4″ Flathead nails per side per stud (this woks much better if you have help to hold the 2×4’s in place).
- Follow steps 7 and 8 of method one.
Fun Box
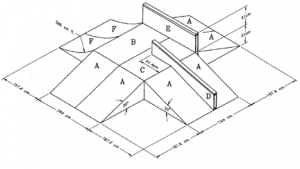
Scale: ¼’’ = 1’
Funbox- Ramp A
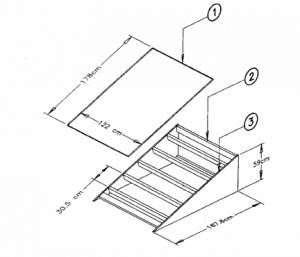
Number of Ramp A Required: 6
Materials Required:
| Item # | Description | Quantity |
| 3 | 1.9 cm thick plywood | 2 |
| 2 | 3.8 cm x 8.9 cm x 118.2 cm long wood studs | 8 |
| 1 | 1.9 cm Thick Plywood |
This is just a preview. The entire section has 1487 words. Click below to download the full Secrets of The Secrets of Skateboarding.
PREV
Making a Skate Video
Making a Skate Video